Settings
To go to the “Settings” page, click on the corresponding item in the main menu.
The “Settings” page consists of several sections.
“Patients” section
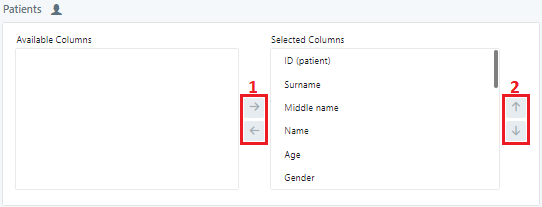
To customize the display of columns in the patient table, move the column names between the lists: “Available columns” and “Selected columns”, by selecting the column name and using the “Add” and “Remove” buttons (1). To set the order in the list of selected columns, select the column name and use the “Up” and “Down” buttons (2).
“Samples” section
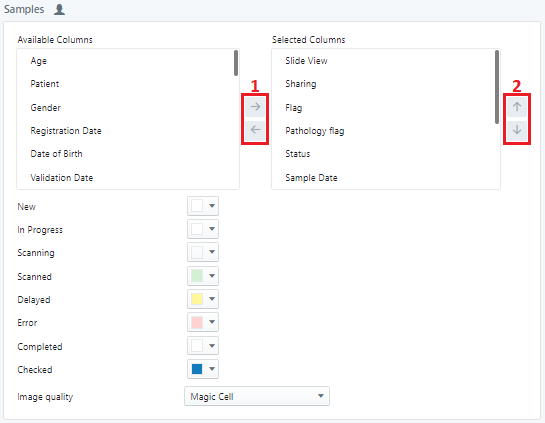
To customize the display of columns in the sample table, move the column names between the lists: “Available columns” and “Selected columns”, by selecting the column name and using the “Add” and “Remove” buttons (1). To set the order in the list of selected columns, select the column name and use the “Up” and “Down” buttons (2).
To change the color highlighting of the samples depending on the status, select the colors next to the required statuses.
You can select one of the image enhancement options in the “Image quality” drop-down list:
- “Original image”;
- “Sharpness”;
- “Magic Cell”.
“Gallery” section

In the “Gallery” section, you can customize the sizes of gallery elements for each type of sample.
“Report” section
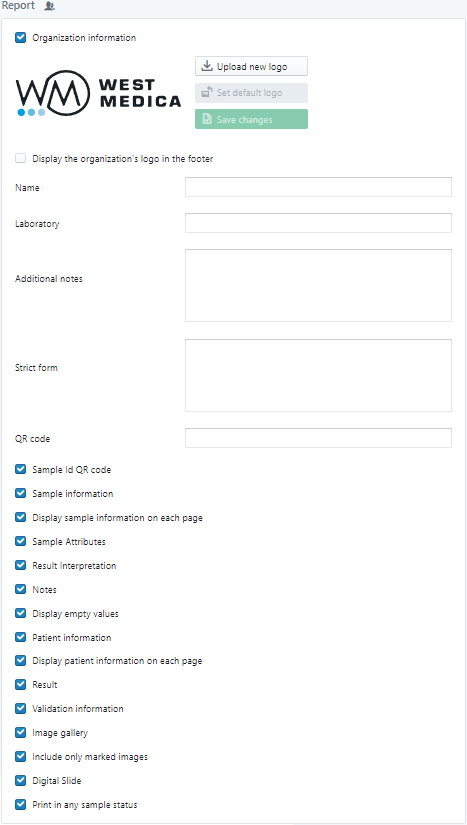
This section contains the report generation settings and allows you to choose the fields that will be included in the report.
- “Organization information” — checkbox for displaying the following fields in the report:
- “Logo” — logo of the organization displayed on the form sheet;
- “Display the organization’s logo in the footer” — checkbox for displaying the logo of the organization in the report footer;
- “Name”;
- “Laboratory”;
- “Additional notes”;
- “Strict form”;
- “QR code”;
- “Sample information”;
- “Sample ID QR code”;
- “Display sample information on each page”;
- “Patient information”;
- “Display patient information on each page”;
- “Results”;
- “Display empty values”;
- “Digital Slide”;
- “Image gallery”;
- “Include only marked images” — check the box to only include marked images in the report;
- “Microview” — enabling/disabling the inclusion of the micropicture in the report;
- “Sample Attributes”;
- “Results Interpretation”;
- “Note”;
- “Validation information”;
- “Print in any sample status” — check the box to allow printing reports for samples with any status.
“Archiving” section

In the “Archiving” section, you can customize the rules for automatic sample archiving, deleting samples from the archive, and deleting images from archived samples.
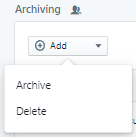
To add a rule, click “Add”. Select the desired item from the drop-down list to add the corresponding rule.
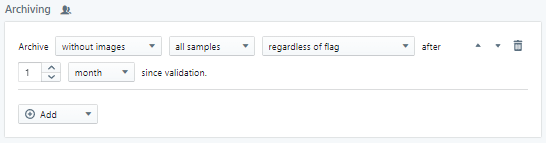
An archiving rule consists of the following custom fields and buttons:
- Choosing whether to archive samples with or without images;
- Selecting the type of samples to be archived;
- Selecting the samples to be archived based on the pathology flag;
- The number of days, months, or years after validation, after which the sample will be archived;
- Selecting a time unit — day, month or year;
Attention
The priority of the rule depends on its position in the list. The higher the rule, the higher its priority.
- Button to move the rule up the list;
- Button to move the rule down the list;
- Button to remove the rules.
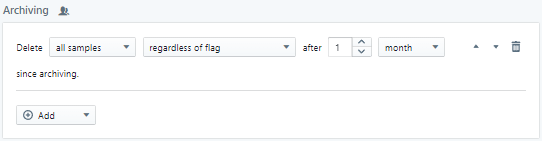
The rule for deleting samples from archive or images from archive samples consists of the following custom fields and buttons:
- Selecting the type of samples subject to the rule;
- Selecting the samples subject to the rule based on the pathology flag;
- The number of days, months, or years after archiving, after which the sample will fall under the rule;
- Selecting a time unit — day, month or year;
Attention
The priority of the rule depends on its position in the list. The higher the rule, the higher its priority.
- Button to move the rule up the list;
- Button to move the rule down the list;
- Button to remove the rules.
“LIS” section

The “LIS” section is used to configure communication with the LIS. Use the following checkboxes to enable or disable the corresponding functions:
- “Manually sending results to the LIS”;
- “Manual request for orders from LIS”;
- “Send to the LIS when switching to “Completed””.
“Reset settings” section
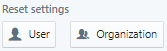
This section contains two buttons:
- “User” — resets user settings;
- “Organization” — resets organization settings.