Viewing DS samples
Click on the sample row in the table or on the image in the sample gallery to open the sample for viewing.
Move around the digital slide by moving the mouse while holding down the left button or by moving the rectangle on the thumbnail. To change the zoom, use the mouse wheel or the zoom selection drop-down list.
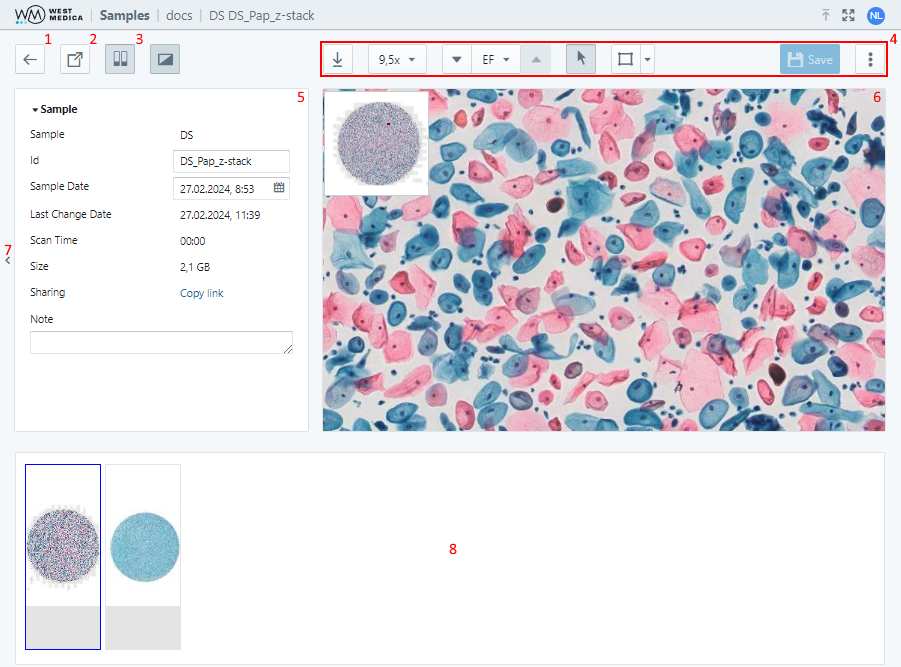
The sample viewing page contains the following items:
- “Back” button — click to return to the sample location;
- “Share” button — provides a link to the sample;
- “Slide View” button — shows/hides the slide view area (the button is available if the sample is in the folder);
- Sample toolbar — contains the tools for work with the sample;
- Sample attribute window — displays the sample attributes;
- Viewing window — sample overview;
- “Description” window — displays the description of the digital slide (the window is available if a description was added for the digital slide);
- Attribute window control button — show/hide the attribute window;
- “Description” window control button — show/hide the “Description” window containing the description of the digital slide;
- Slide view area — displays other samples from the folder.
The digital slide is displayed in the sample viewing window.

The following tools are available:
- “Download image” — saves the image displayed in the viewing window;
- “Image zoom” — selects the digital slide zoom option;
- Multi-layer DS viewing controls — focusing on different layers of the digital slide, available for multi-layer DS;
- “View mode” — switches to DS view mode;
- "Annotations" — toggles the mode for adding annotations to digital slides;
- “Move to…” moves the digital slide to the center of the viewing area using the specified coordinates;
- “Rotate DS” — rotates the image of the digital slide by a specified angle;
- “Color Settings” — adjusts the digital slide color parameters;
- “View” — configuring the display of auxiliary elements:
- “Show/Hide coordinates” — enables/disables display of cursor coordinates on the digital slide;
- “Show/Hide navigator” — toggles DS thumbnail display;
- “Show/Hide label” — toggles DS label display;
- “Show/Hide annotations” — toggles display of annotations on digital slides;
- “Show/Hide scale”— toggles display of a measuring scale on the DS;
- “Save” — saves the changes made to the sample.
Attention
To change the scale with the mouse wheel when working with a digital slide in annotation mode, hold down the “Shift” key on the keyboard.
DS description
The “Description” block is designed to add supplementary text to a digital slide with the option to attach saved links to its areas.
The interface operates in two modes: viewing (active by default) and editing.
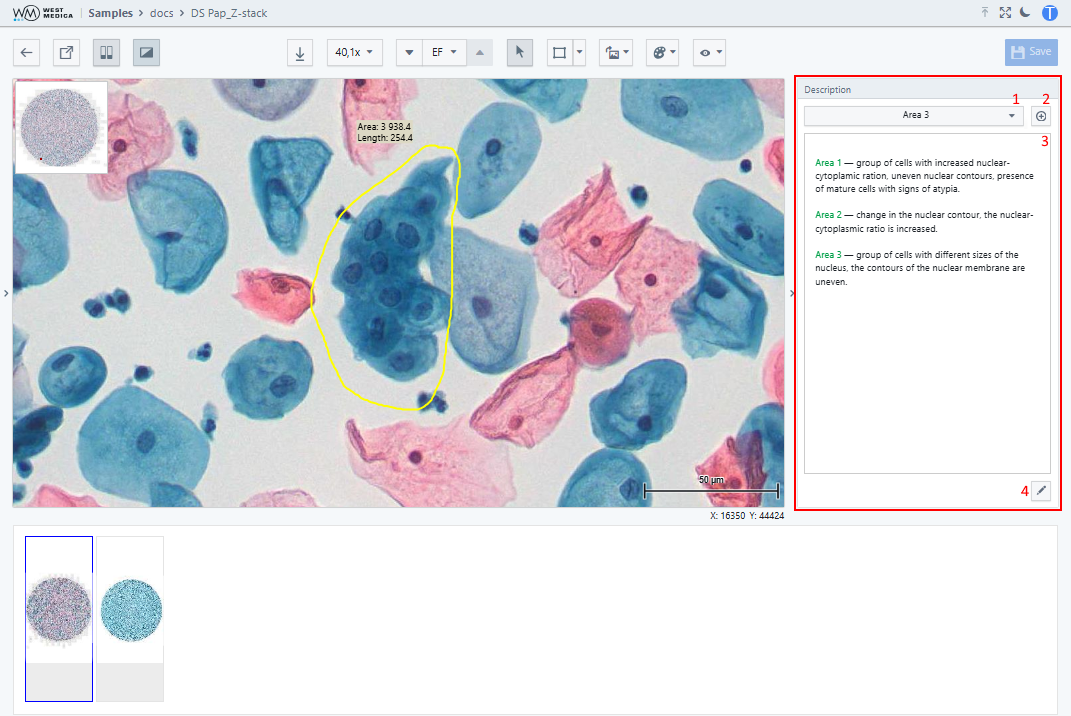
Viewing mode
In the viewing mode, the “Description” block consists of the following elements:
- "DS areas” drop-down list — allows selecting a saved area of the digital slide to automatically navigate to it in the viewing window;
- “Add area” button — saves the current area of the digital slide from the viewing window under the specified name;
- Text field — displays the added description;
- “Edit Mode” button — activates the editing mode in the “Description" block for entering and changing text.
Editing mode
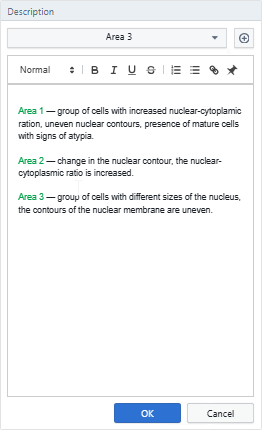
When the mode is activated, a toolbar opens above the text field. The “OK” and “Cancel” buttons are used to save or cancel the changes.

The toolbar of the text editor consists of the following elements:
- The “Style” drop-down list — formats the current or highlighted row according to the selected style;
- A block of sticky font style selection buttons:
- Bold;
- Italic;
- Underline;
- Strike;
- “Ordered List” button — formats the current or highlighted row as an element of a numbered list;
- “Bullet List” button — formats the current or highlighted row as an element of a bulleted list;
- “Link” button — allows converting text into a hyperlink to a specified web address;
- “Link to the area” button — allows converting text into a hyperlink to a specified area of the digital slide.
Tip
First, save the required areas of the digital slide using the “Add area” button, so that you can quickly use them when creating hyperlinks in the text.