Testing
Selecting a test
Click the "Tests" button in the menu on the left to see the list of available tests.
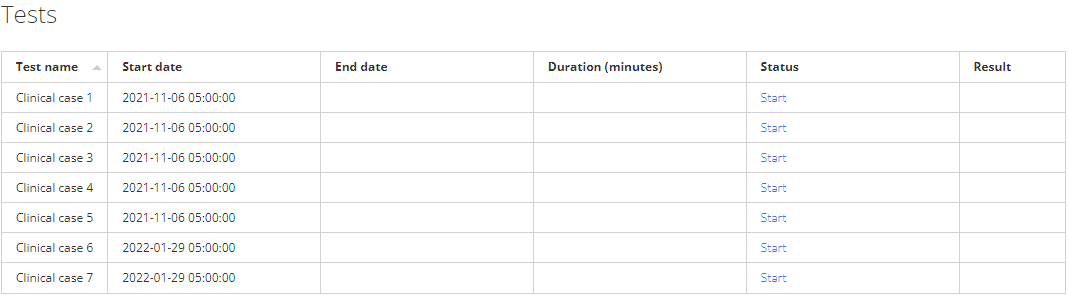
For each test, the table shows the name, start and end dates, duration in minutes, status and result.
If no end date is specified for the test, then there is no deadline for passing the test, otherwise you need to complete the test before the specified date.
If the duration of the test is not specified, then the end date acts as the deadline for its completion, otherwise the test must be completed within the specified time. When you start a test with a set duration, a countdown timer activates. When the timer expires, the test closes without saving the results.
If a test has not been started, it has the "Start" status. If a test has been started but has not been finished, its status changes to "Continue". When a test is completed, its status changes to "Finished".
Depending on the selected community, different sets of specified tests are available. If you select the "Hematology" community, the set will include tests based on CBC and bone marrow samples. The tests for the “Cytology” community are based on Pap, Pap ICC, BF and STDs samples.
To start a test, click on the "Start" link in the "Status" column of the selected test.
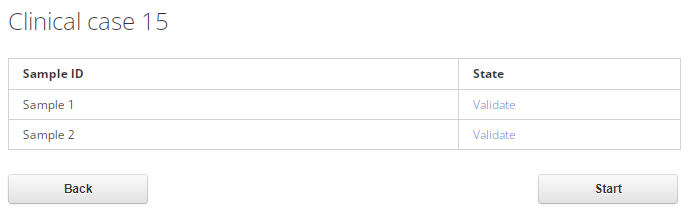
You will see a table with samples that require validation. The test shown in the image above contains two samples (Sample 1 and Sample 2). To validate samples in order, click the "Start" button under the table. To validate a specific sample, click "Validate" in the corresponding line.
Sample validation
To switch between the sample tabs, use the "Save and continue" button or the tab switching panel, in both cases the changes will be saved.
If the sample contains a digital slide, the “Open DS” button will be displayed, and the “Summary” tab will include the image of the digital slide and the “Open the digital slide” link. Click on any of these items to view the digital slide.
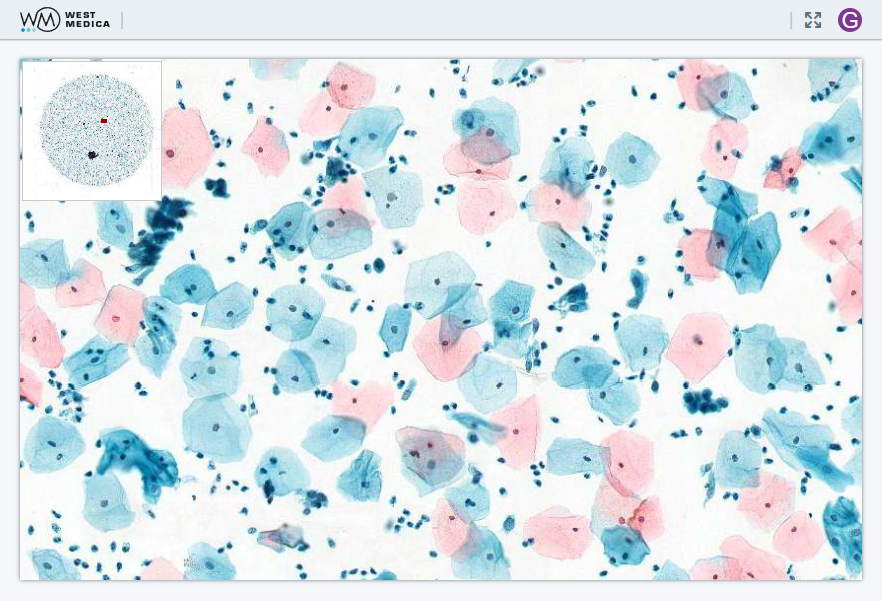
The digital slide will open in a new browser tab. Navigate around the slide by holding the left mouse button and moving the mouse. Use the mouse wheel to change the zoom.
CBC sample validation
To pass the test, you need to determine the type of white blood cells and other cells (WBC) and set the parameter values of red blood cells (RBC).
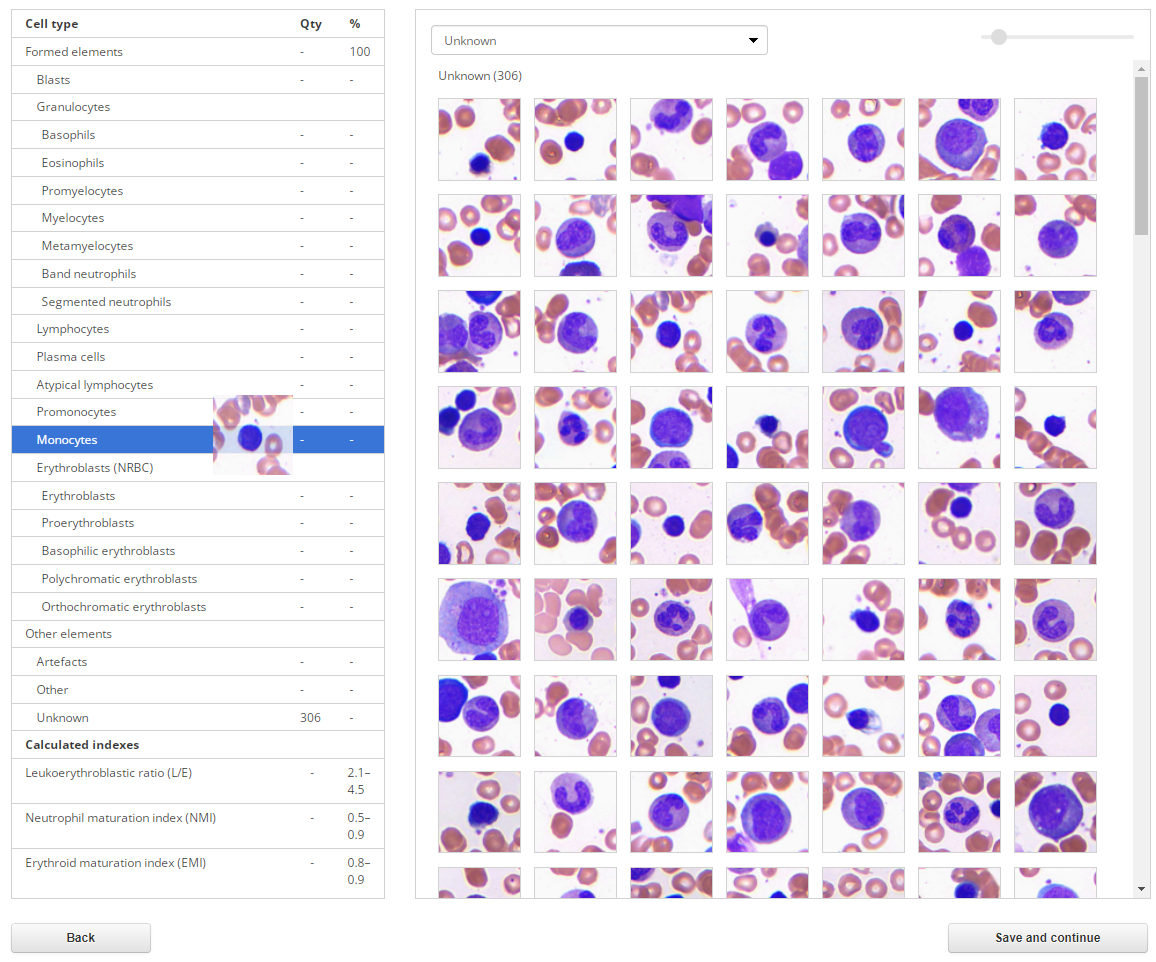
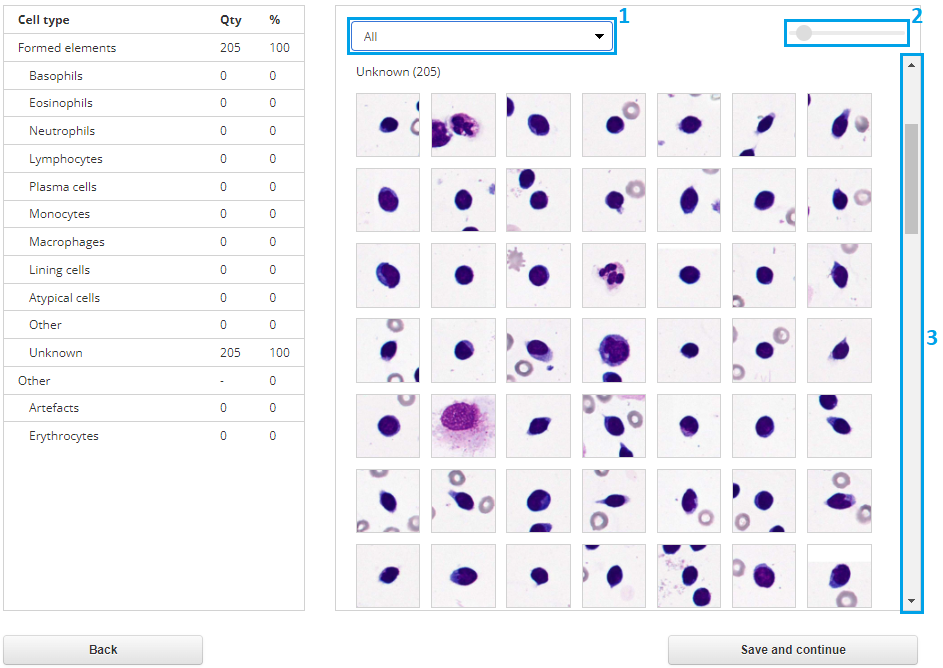
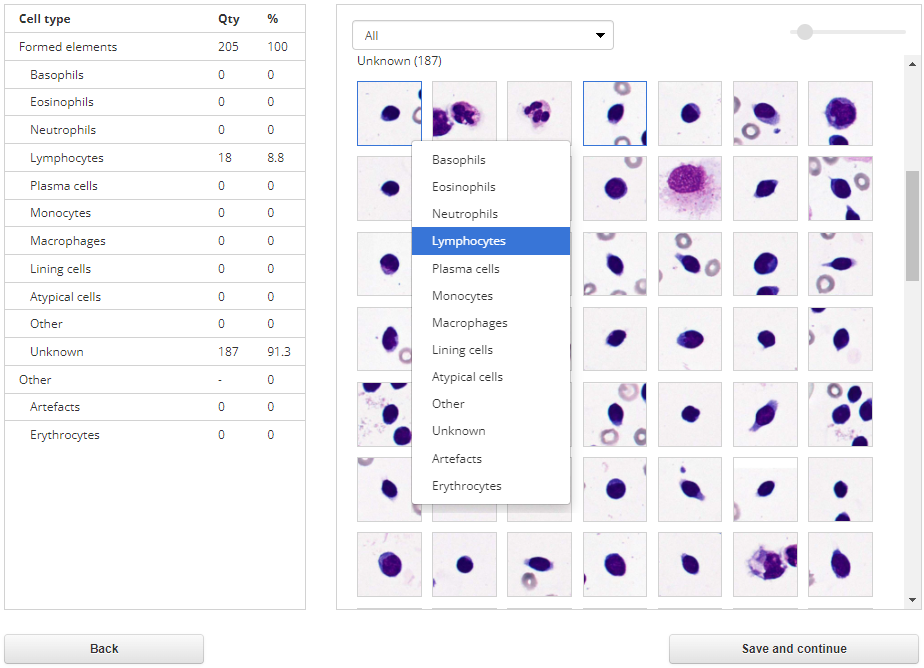
"WBC" tab
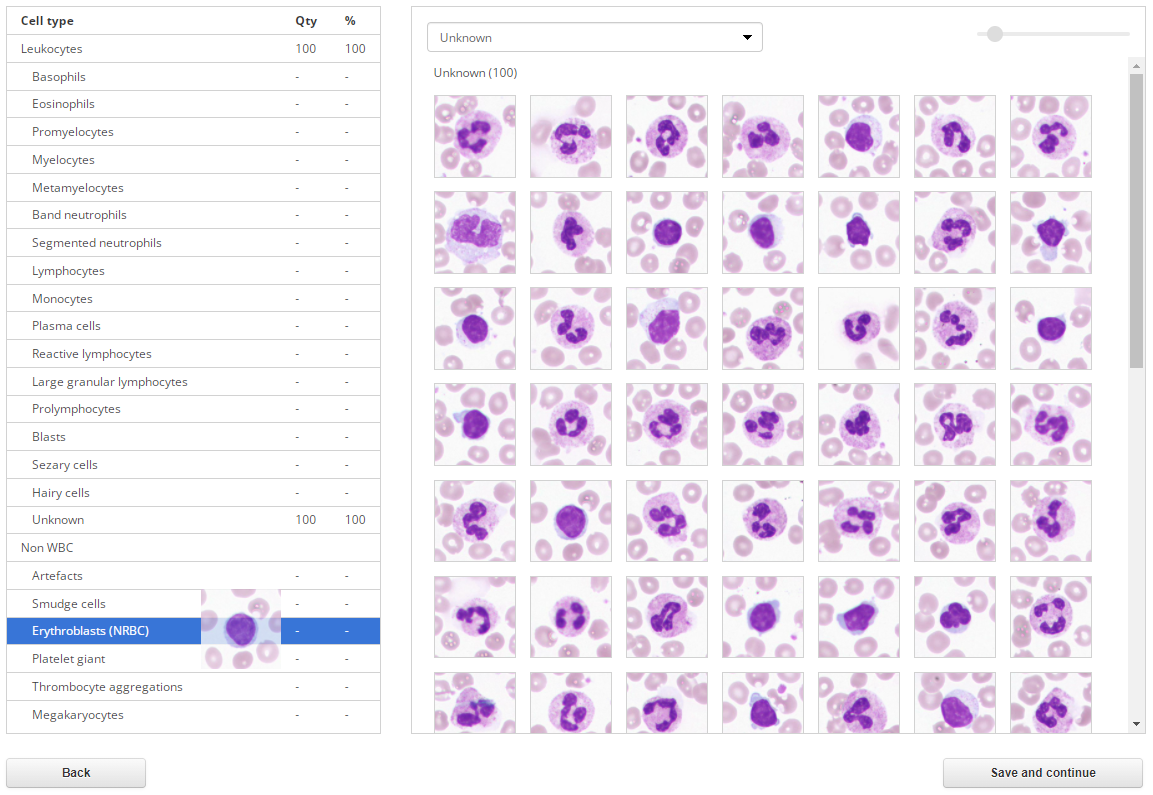
This tab allows you to view and change cell types.
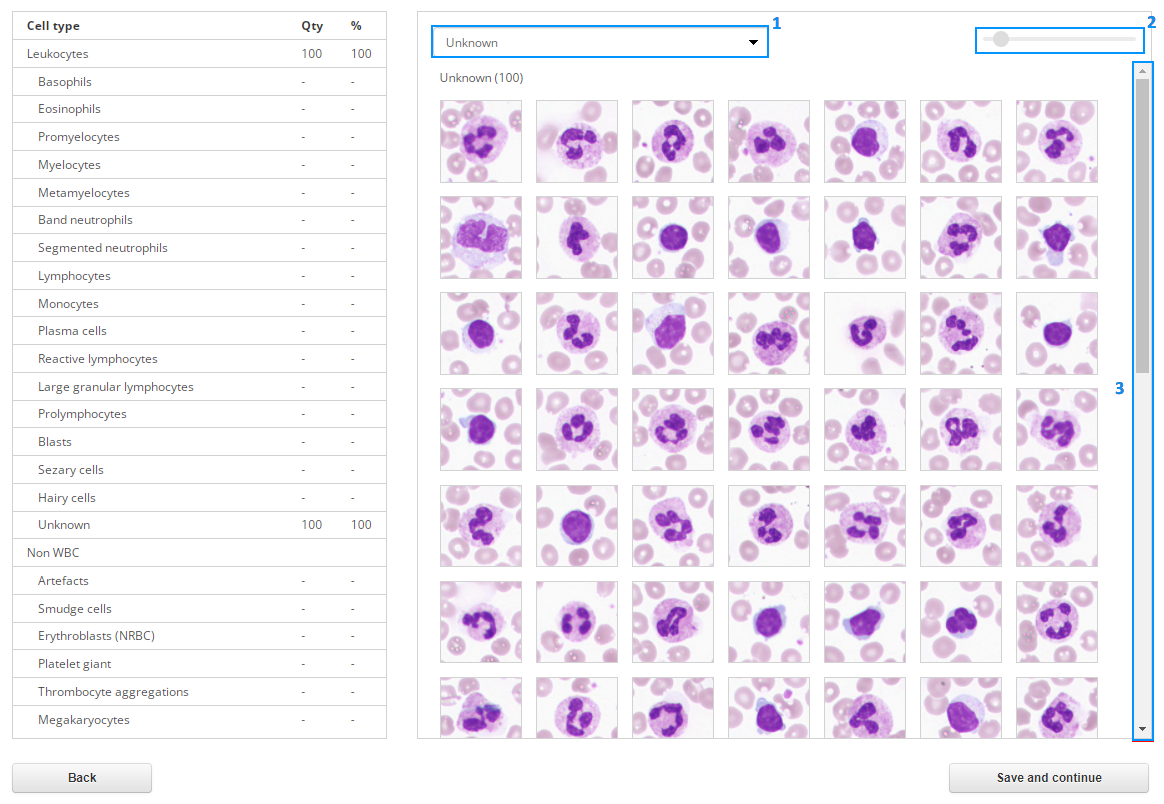
The "WBC" tab consists of two sections:
- Table of cell types;
- Gallery of cell images.
Initially all cells are displayed as unknown. You can select the type of cells to view in the drop-down list at the top of the gallery (1). In the upper right corner there is a tool for changing the zoom of cell images (2). Use the scroll bar (3) to view all the cells.
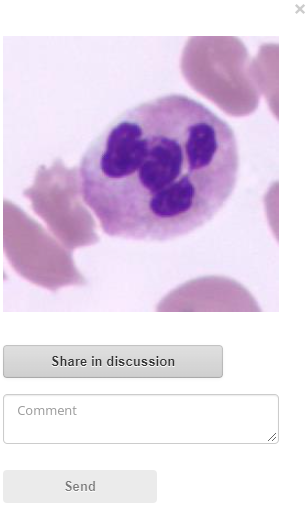
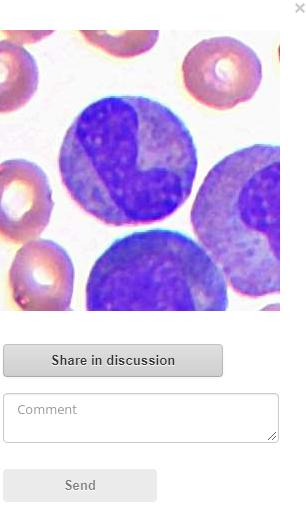
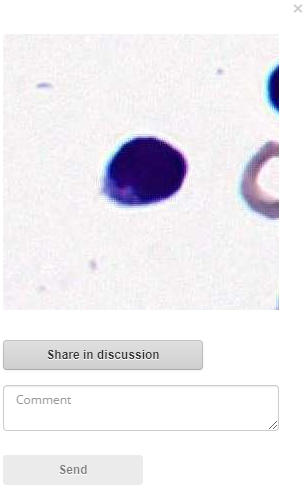
Left-click on a cell and press the "Space bar" on the keyboard to see a quick preview. To close the quick preview, press the "Space bar" again or click on the cross in the upper right corner of the pop-up window.
To create a discussion with the opened image attached, click the "Share in discussion" button. Enter your comment in the text field and click the "Send" button. The discussion with the image and your comment will be published on the "Discussion" page.
Ways to work with the gallery:
Moving cells from the gallery to the table of types
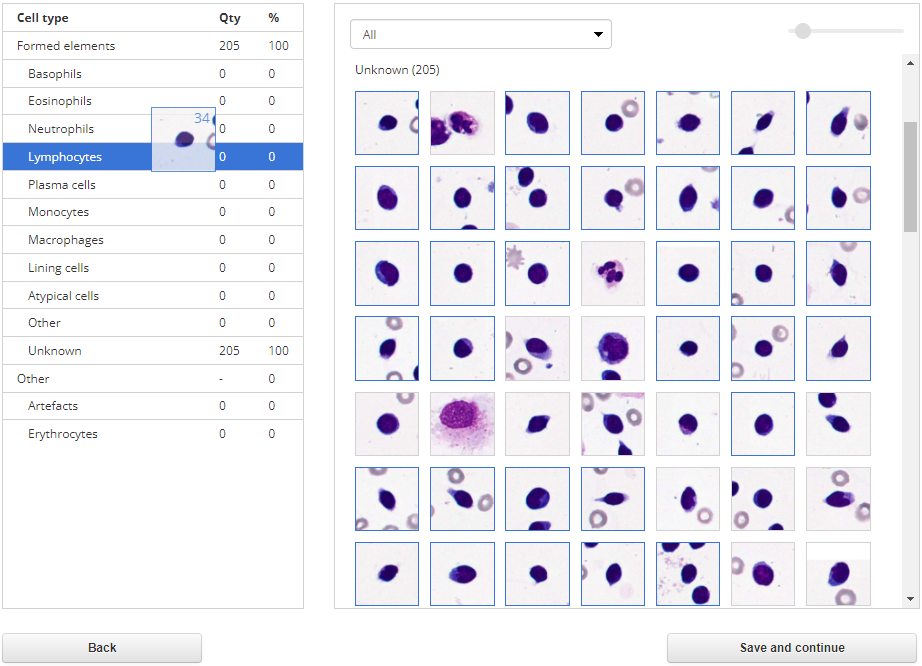
To move one cell, hold down the left mouse button on the desired image and drag the cell to the table row with the name of the desired type (the background of the row will turn blue), then release the left mouse button. The number of cells of the selected type in the table will change.
To move multiple cells, left-click on each cell image, they will be highlighted with blue frames. To select all the cells in a group, click on its name. When the desired cells are selected, hold down the left mouse button on one of them and drag the cell to the table row with the name of the desired type (the background of the row will turn blue), then release the left mouse button.
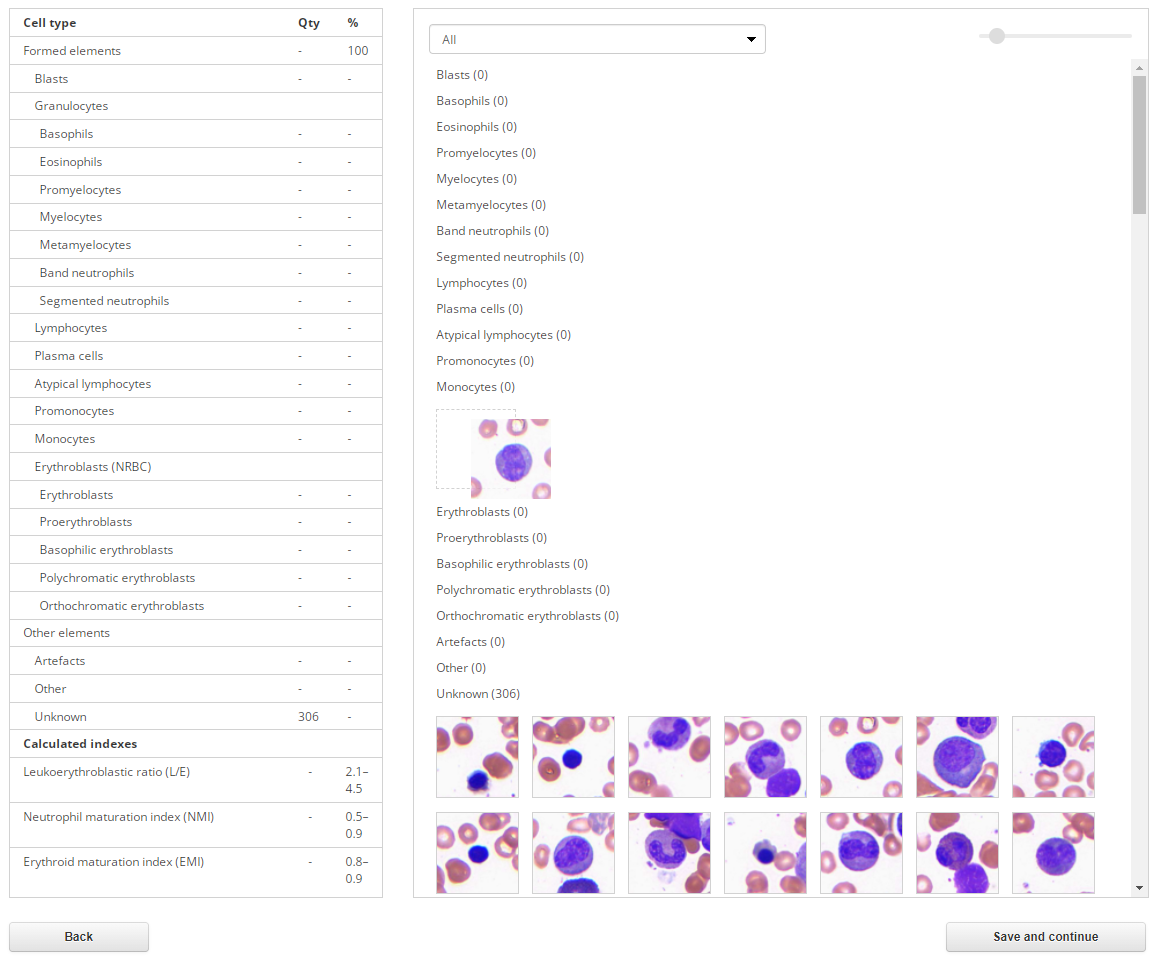
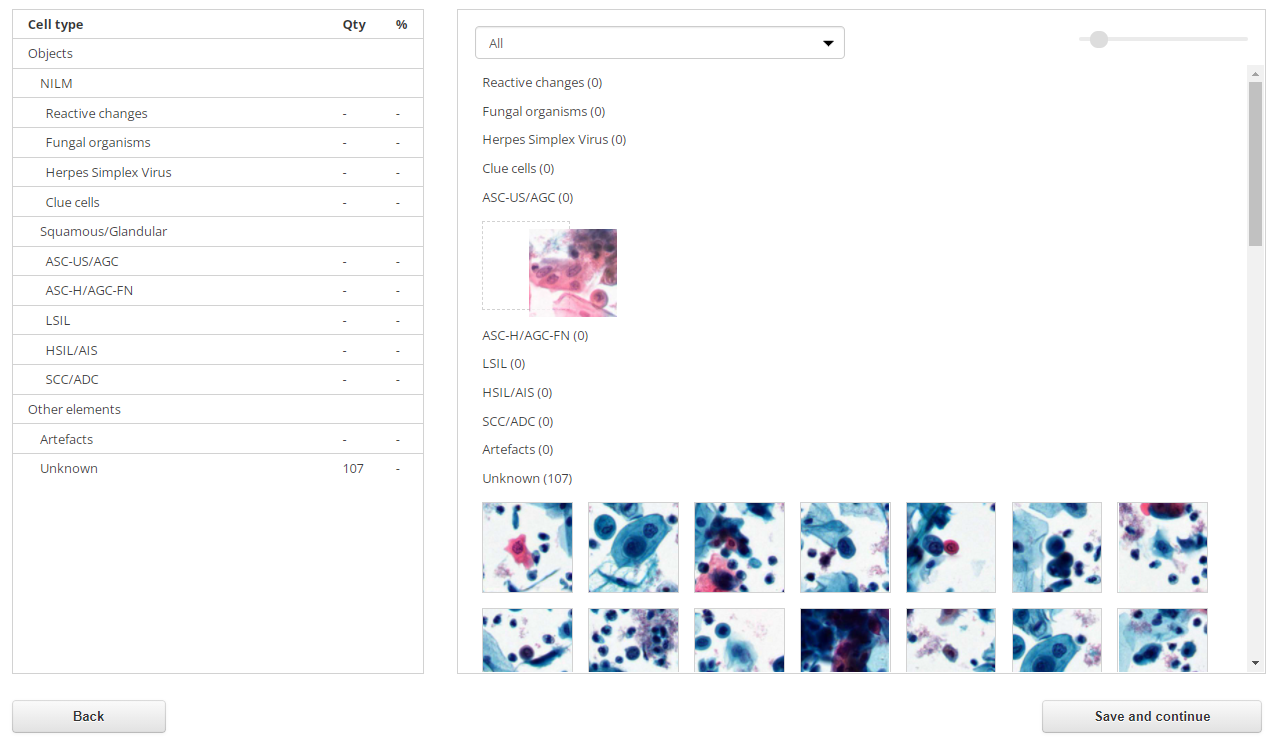
Moving cells in the list with images
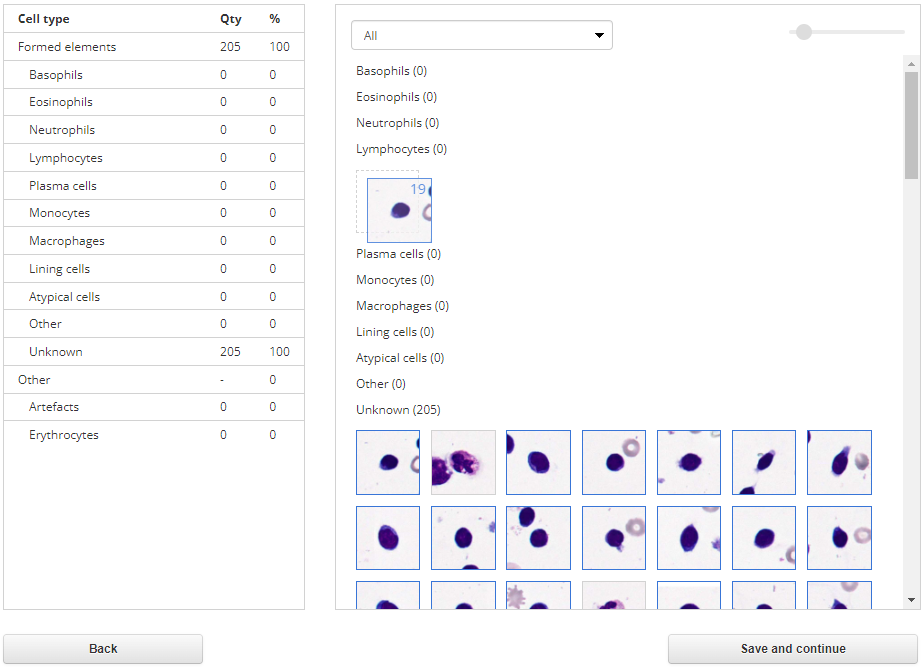
Select "All" in the drop-down list. All cell groups will be simultaneously displayed in the gallery. The number of cells of each type is indicated in brackets.
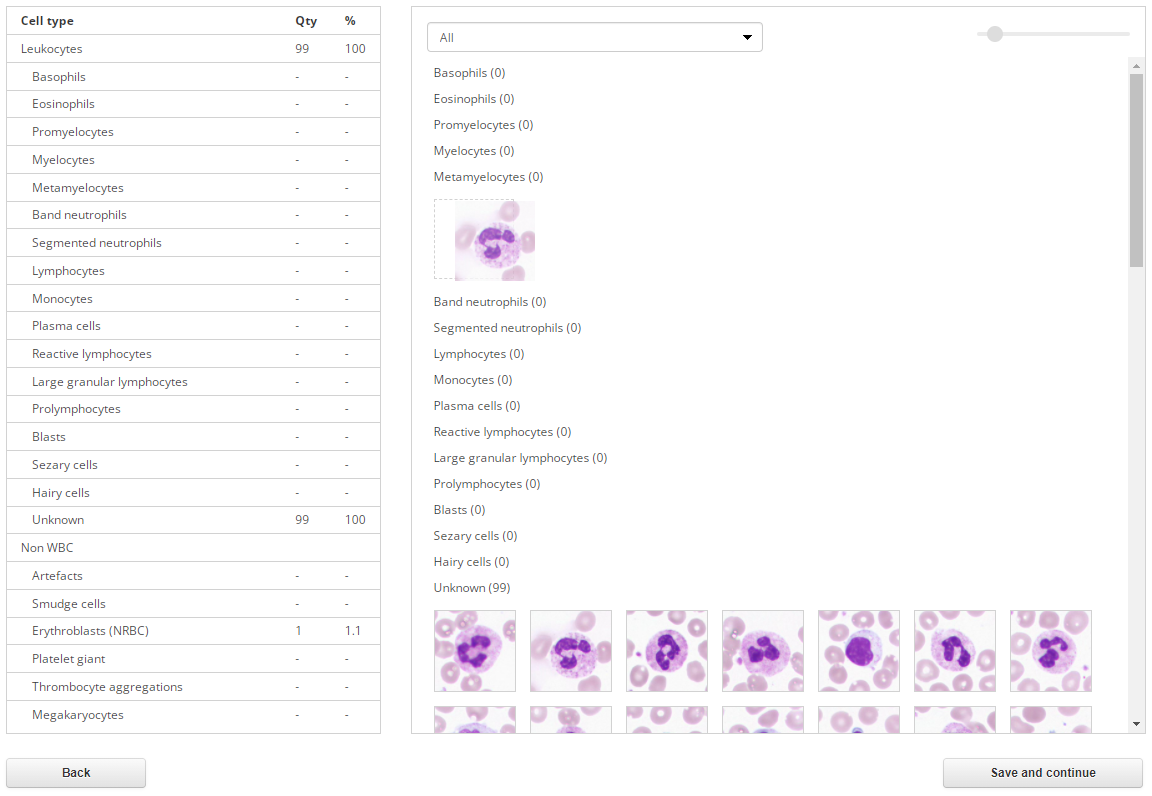
Select one or more cells. To select all the cells in a group, click on its name. Place the cursor on one of the selected cells. Hold down the left mouse button and drag the image of the cell up or down the gallery to move all the selected cells to another group. The placement field with a dotted border will indicate the place the selected cells will move to. If there are other cells in the group, then drag the cell/group of cells onto them until a placement field is displayed. Then release the left mouse button.
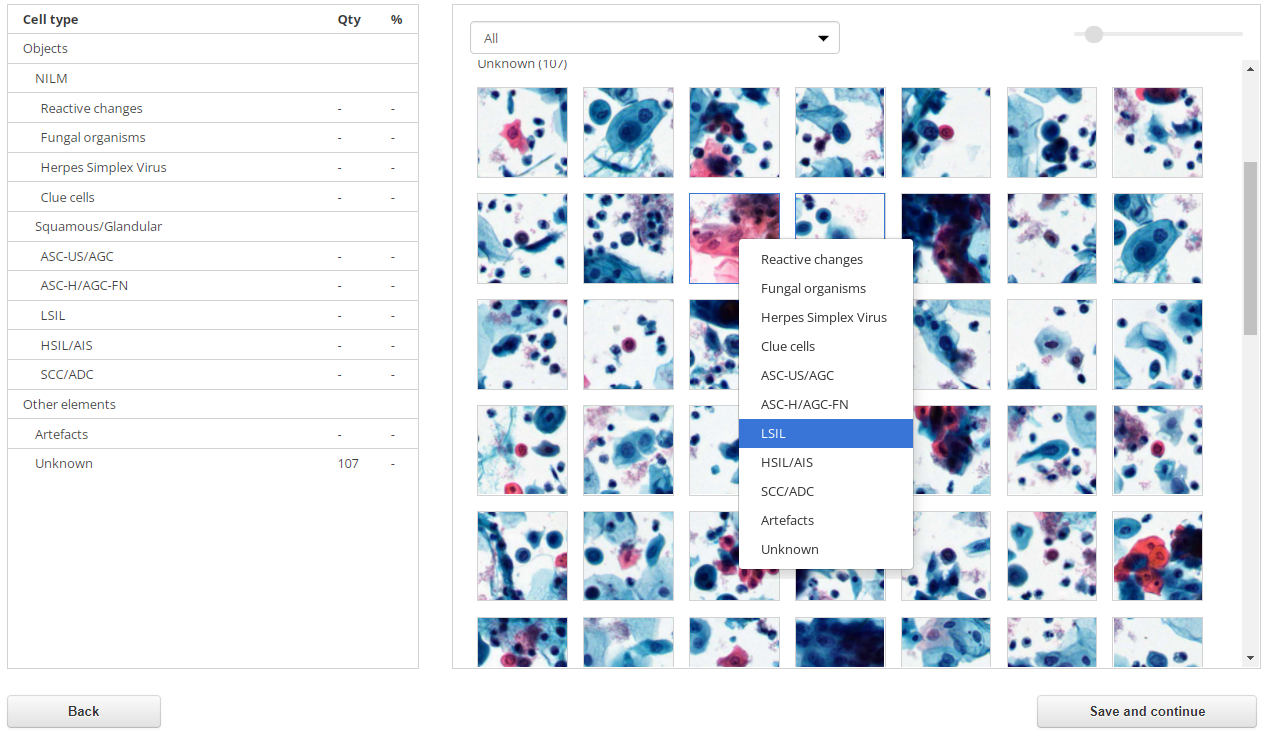
Selecting a cell type via the context menu
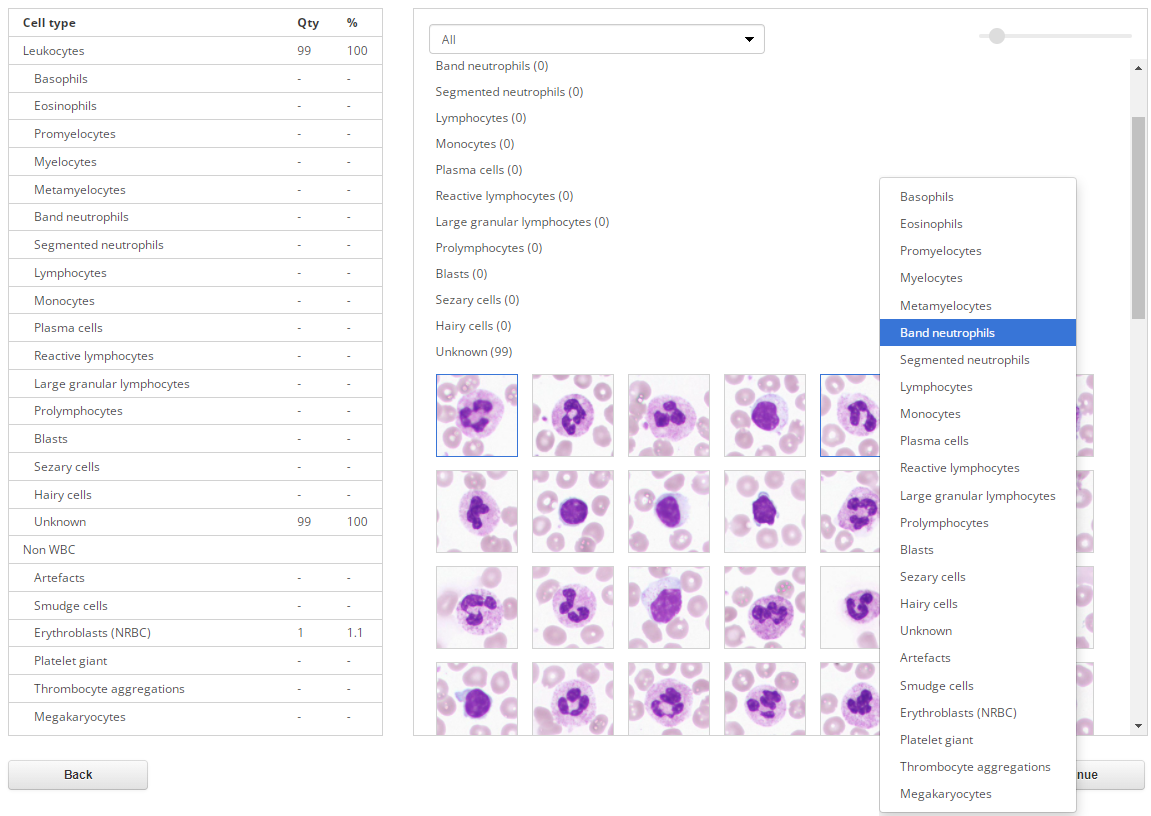
In addition to moving the image of the cell, you can select its type in the context menu. Right-click on the selected cell to summon its context menu, then select the desired type in it with the left mouse button.
To select a type for multiple cells, left-click on each cell image, they will be highlighted with blue frames. Then right-click on one of the selected cells to summon the context menu, and select the desired type in it using the left mouse button. To select all the cells in a group, click on its name.

Once finished with all the cells, click "Save and continue" in the lower right part of the screen. After saving, you will be automatically taken to the "RBC" tab.
"RBC" tab
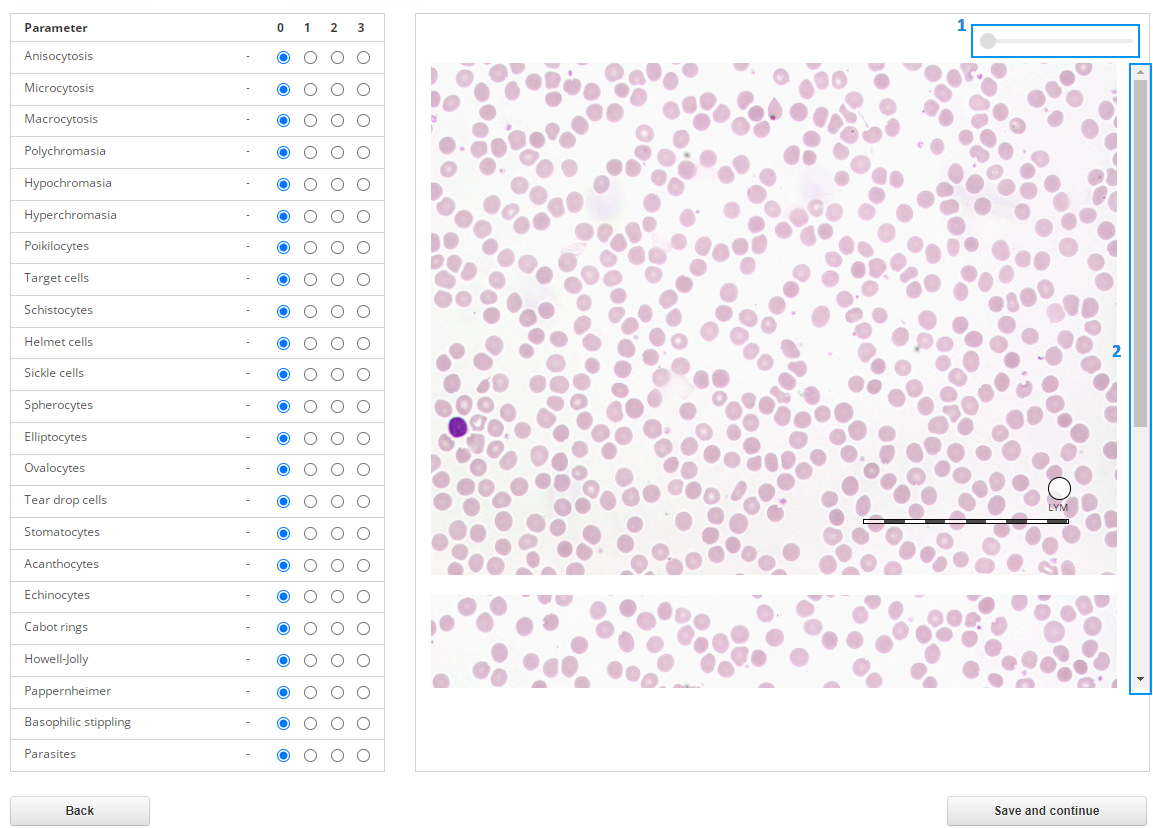
The "RBC" tab consists of two sections:
- Table of RBC parameters;
- Sample image.
Just like on the "WBC" tab, on the "RBC" tab there is a tool for zooming the sample image (1), and the scroll bar (2) for viewing the enlarged sample image.
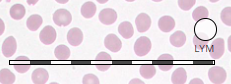
To evaluate the morphology of red blood cells by their size in the image, use the "Ruler" and "Small lymphocyte" tools.
Set the required parameter values in the table using the radio buttons in the corresponding columns. Then click "Save and continue" to save the results and switch to the "Summary" tab.
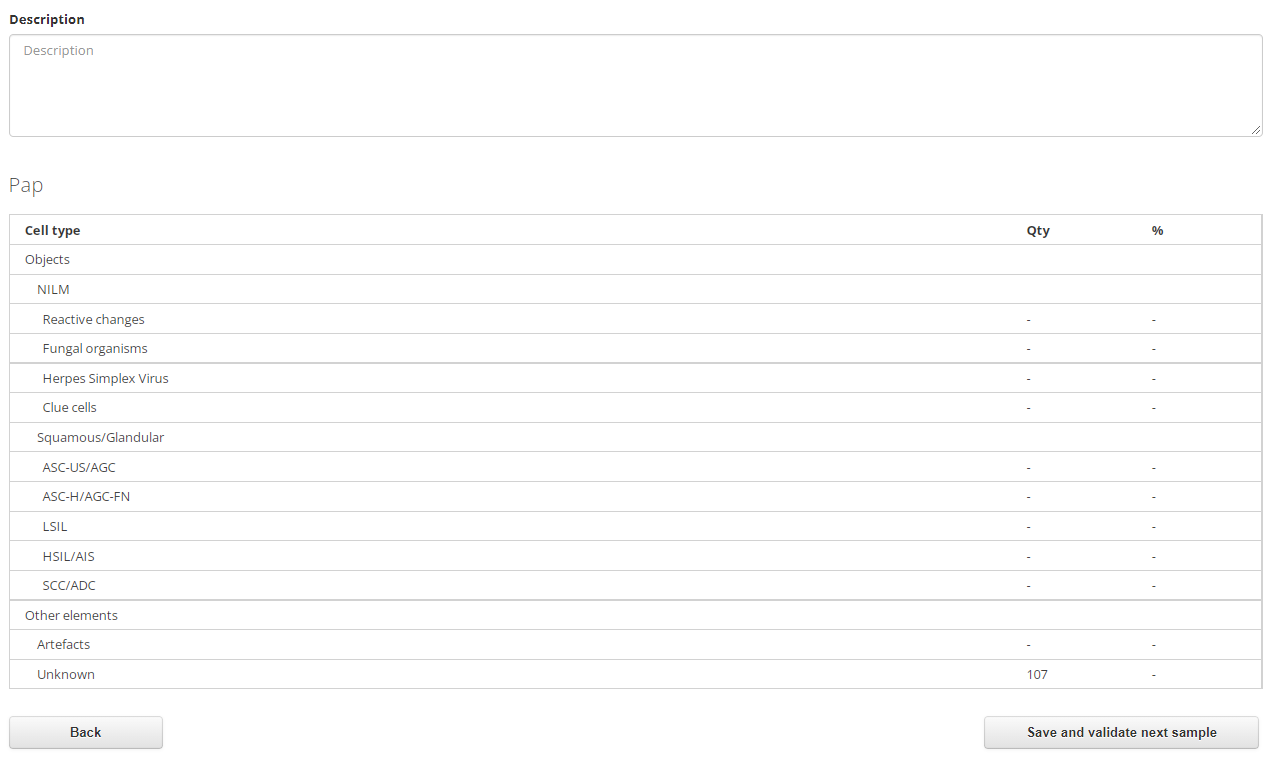
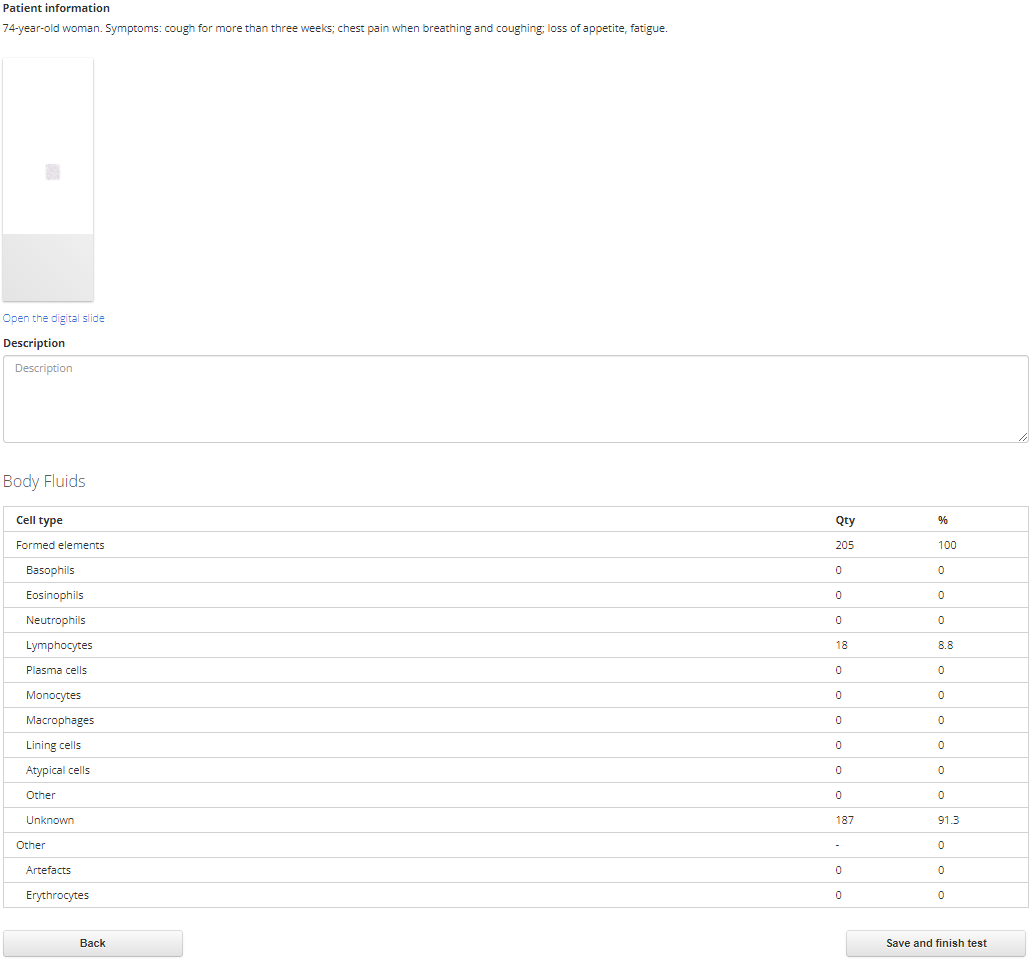
"Summary" tab
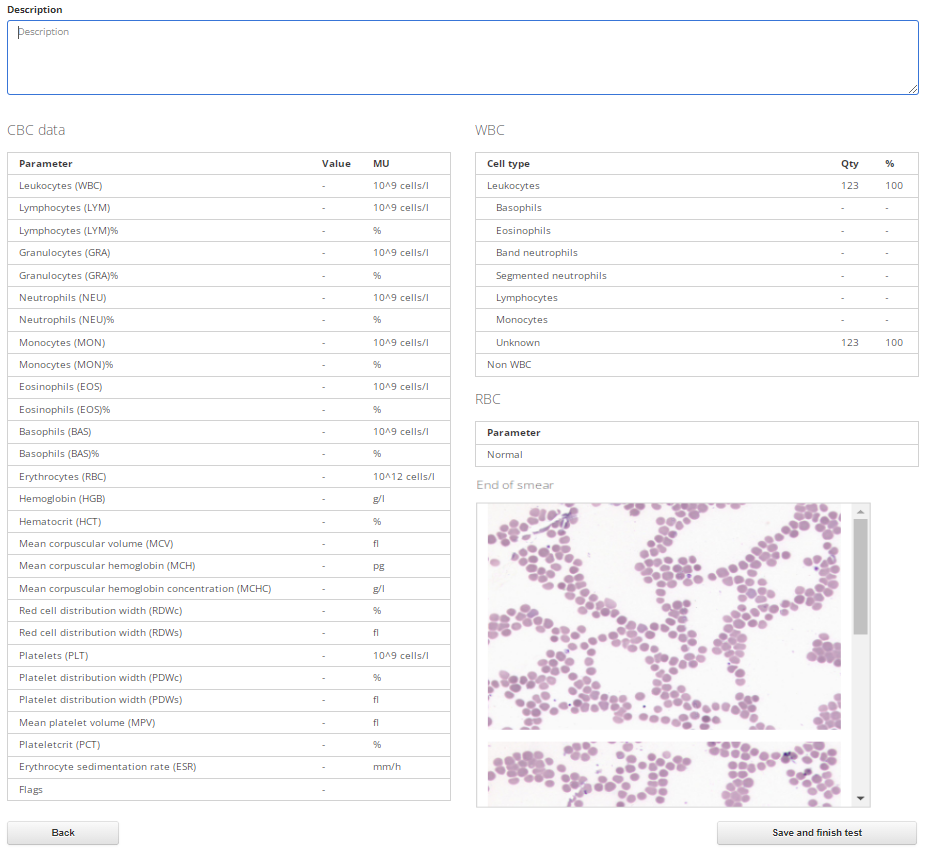
Use the “Description” field to add details to the summary. The tab also displays the “WBC” and “RBC” tables and, if available, the table with CBC data, images of the end of smear, as well as the "Sample Information" and "Patient Information" fields. To go to the "RBC" tab, click "Back".

If there are several samples in the test, click "Save and validate next sample" to validate the next sample.
BM sample validation
To pass the test, you need to determine the type of bone marrow cells.
"Cells" tab
This tab allows you to view and change cell types.

The "Cells" tab consists of two sections:
- Table of cell types;
- Gallery of cell images.
Initially all cells are displayed as unknown. You can select the type of cells to view in the drop-down list at the top of the gallery (1). In the upper right corner there is a tool for changing the zoom of cell images (2). Use the scroll bar (3) to view all the cells.
Left-click on a cell and press the "Space bar" on the keyboard to see a quick preview. To close the quick preview, press the "Space bar" again or click on the cross in the upper right corner of the pop-up window.
To create a discussion with the opened image attached, click the "Share in discussion" button. Enter your comment in the text field and click the "Send" button. The discussion with the image and your comment will be published on the "Discussion" page.
Ways to work with the gallery:
Moving cells from the gallery to the table of types
To move one cell, hold down the left mouse button on the desired image and drag the cell to the table row with the name of the desired type (the background of the row will turn blue), then release the left mouse button. The number of cells of the selected type in the table will change.
To move multiple cells, left-click on each cell image, they will be highlighted with blue frames. To select all the cells in a group, click on its name. When the desired cells are selected, hold down the left mouse button on one of them and drag the cell to the table row with the name of the desired type (the background of the row will turn blue), then release the left mouse button.
Moving cells in the list with images
Select "All" in the drop-down list. All cell groups will be simultaneously displayed in the gallery. The number of cells of each type is indicated in brackets.
Select one or more cells. To select all the cells in a group, click on its name. Place the cursor on one of the selected cells. Hold down the left mouse button and drag the image of the cell up or down the gallery to move all the selected cells to another group. The placement field with a dotted border will indicate the place the selected cells will move to. If there are other cells in the group, then drag the cell/group of cells onto them until a placement field is displayed. Then release the left mouse button.
Selecting a cell type via the context menu

In addition to moving the image of the cell, you can select its type in the context menu. Right-click on the selected cell to summon its context menu, then select the desired type in it with the left mouse button.
To select a type for multiple cells, left-click on each cell image, they will be highlighted with blue frames. Then right-click on one of the selected cells to summon the context menu, and select the desired type in it using the left mouse button. To select all the cells in a group, click on its name.
Once finished with all the cells, click "Save and continue" in the lower right part of the screen. After saving, you will be automatically taken to the "Summary" tab.
"Summary" tab
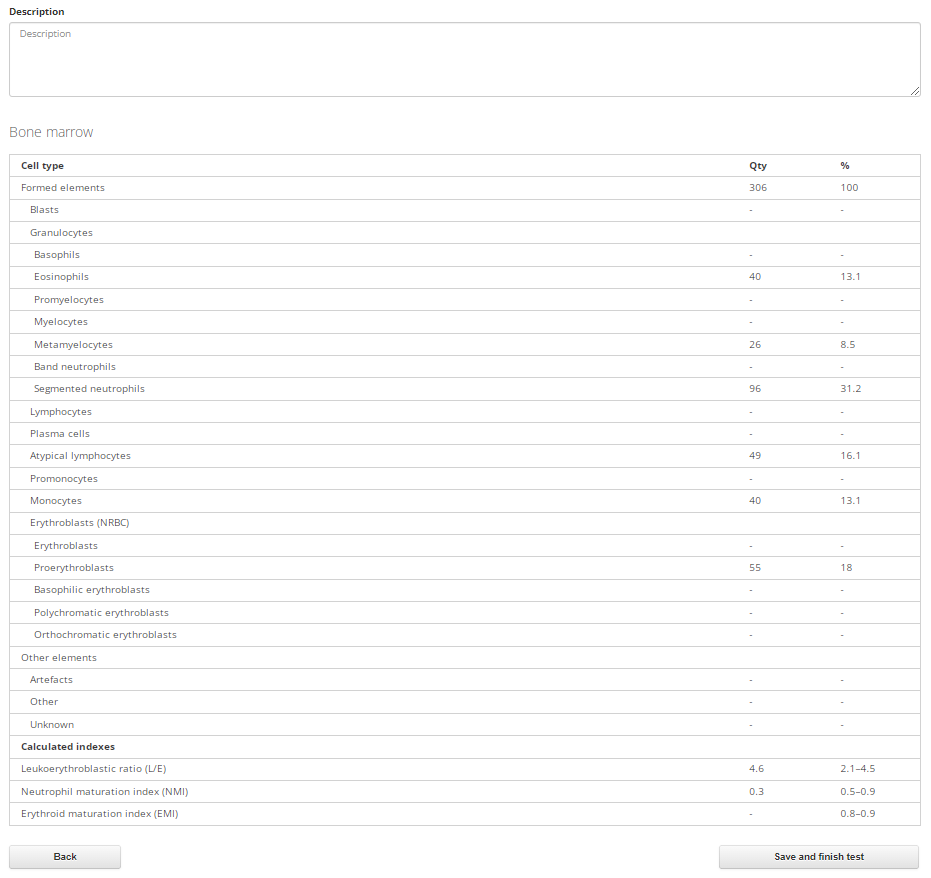
Use the “Description” field to add details to the summary. The tab also displays the table showing the number of identified cells of each type. To go to the "Cells" tab, click "Back".
If there are several samples in the test, click "Save and validate next sample" to validate the next sample.
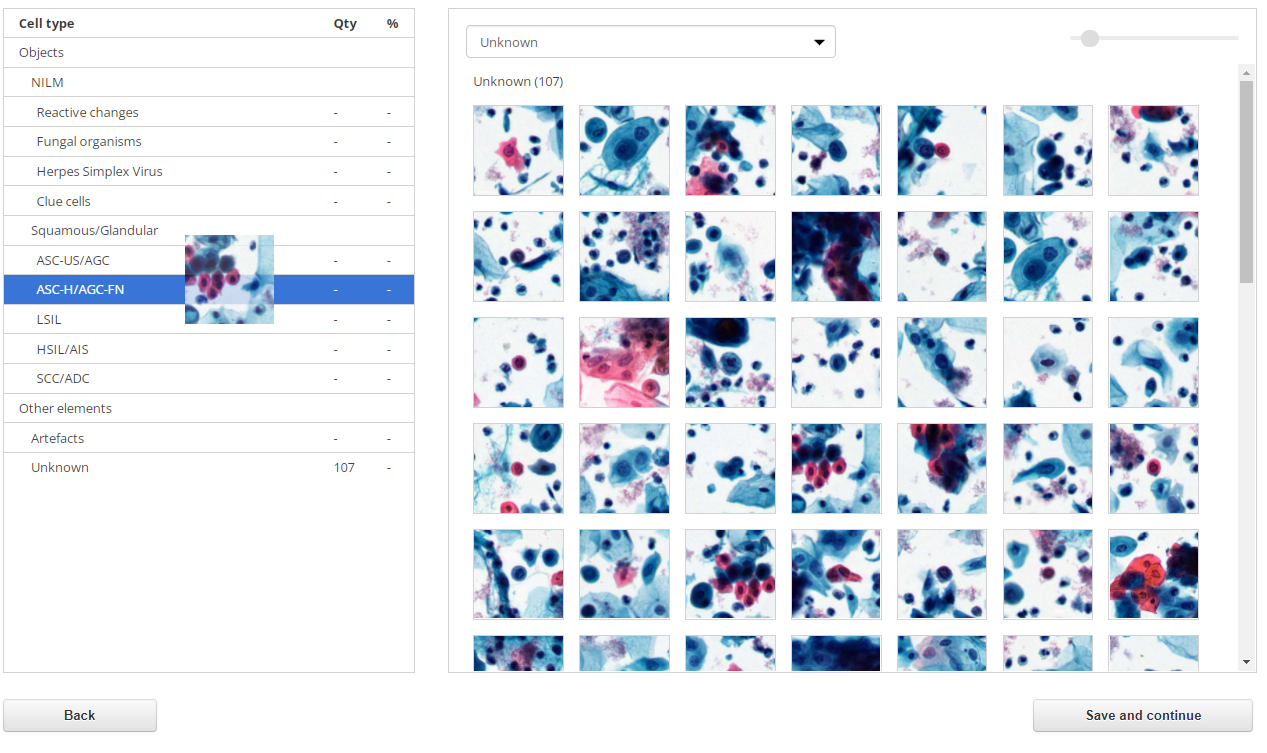
Pap and Pap ICC samples validation
"Cells" tab
This tab allows you to view and change cell types.
The "Cells" tab consists of two sections:
- Table of cell types;
- Gallery of cell images.
Initially all cells are displayed as unknown. You can select the type of cells to view in the drop-down list at the top of the gallery (1). In the upper right corner there is a tool for changing the zoom of cell images (2). Use the scroll bar (3) to view all the cells.

Left-click on a cell and press the "Space bar" on the keyboard to see a quick preview. To close the quick preview, press the "Space bar" again or click on the cross in the upper right corner of the pop-up window.
To create a discussion with the opened image attached, click the "Share in discussion" button. Enter your comment in the text field and click the "Send" button. The discussion with the image and your comment will be published on the "Discussion" page.
Ways to work with the gallery:
Moving cells from the gallery to the table of types
To move one cell, hold down the left mouse button on the desired image and drag the cell to the table row with the name of the desired type (the background of the row will turn blue), then release the left mouse button. The number of cells of the selected type in the table will change.
To move multiple cells, left-click on each cell image, they will be highlighted with blue frames. To select all the cells in a group, click on its name. When the desired cells are selected, hold down the left mouse button on one of them and drag the cell to the table row with the name of the desired type (the background of the row will turn blue), then release the left mouse button.
Moving cells in the list with images
Select "All" in the drop-down list. All cell groups will be simultaneously displayed in the gallery. The number of cells of each type is indicated in brackets.
Select one or more cells. To select all the cells in a group, click on its name. Place the cursor on one of the selected cells. Hold down the left mouse button and drag the image of the cell up or down the gallery to transfer all the selected cells to another group. The placement field with a dotted border will indicate the place the selected cells will move to. If there are other cells in the group, then drag the cell/group of cells onto them until a placement field is displayed. Then release the left mouse button.
Selecting a cell type via the context menu
In addition to moving the image of the cell, you can select its type in the context menu. Right-click on the selected cell to summon its context menu, then select the desired type in it with the left mouse button.
To select a type for multiple cells, left-click on each cell image, they will be highlighted with blue frames. Then right-click on one of the selected cells to summon the context menu, and select the desired type in it using the left mouse button. To select all the cells in a group, click on its name.
Once finished with all the cells, click "Save and continue" in the lower right part of the screen. After saving, you will be automatically taken to the "Summary" tab.
"Summary" tab
If there is an «Interpretation» drop-down list, select an interpretation in it. Fill in the “Description” field.
If there are several samples in the test, click "Save and validate next sample" to validate the next sample.
BF sample validation
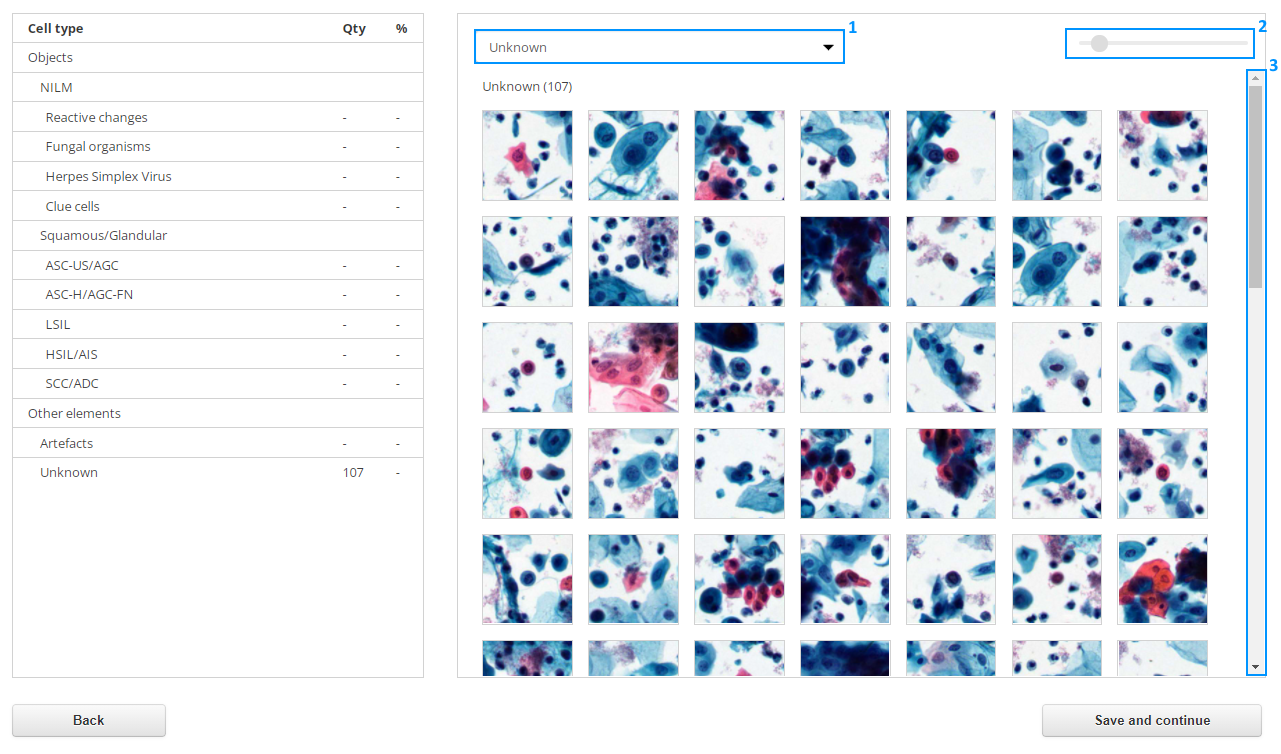
“Cells” tab
This tab allows you to view and change cell types.
The "Cells" tab consists of two sections:
- Table of cell types;
- Gallery of cell images.
Initially all cells are displayed as unknown. You can select the type of cells to view in the drop-down list at the top of the gallery (1). In the upper right corner there is a tool for changing the zoom of cell images (2). Use the scroll bar (3) to view all the cells.
Left-click on a cell and press the "Space bar" on the keyboard to see a quick preview. To close the quick preview, press the "Space bar" again or click on the cross in the upper right corner of the pop-up window.
To create a discussion with the opened image attached, click the "Share in discussion" button. Enter your comment in the text field and click the "Send" button. The discussion with the image and your comment will be published on the "Discussion" page.
Ways to work with the gallery:
Moving cells from the gallery to the table of types
To move one cell, hold down the left mouse button on the desired image and drag the cell to the table row with the name of the desired type (the background of the row will turn blue), then release the left mouse button. The number of cells of the selected type in the table will change.
To move multiple cells, left-click on each cell image, they will be highlighted with blue frames. To select all the cells in a group, click on its name. When the desired cells are selected, hold down the left mouse button on one of them and drag the cell to the table row with the name of the desired type (the background of the row will turn blue), then release the left mouse button.
Moving cells in the list with images
Select "All" in the drop-down list. All cell groups will be simultaneously displayed in the gallery. The number of cells of each type is indicated in brackets.
Select one or more cells. To select all the cells in a group, click on its name. Place the cursor on one of the selected cells. Hold down the left mouse button and drag the image of the cell up or down the gallery to move all the selected cells to another group. The placement field with a dotted border will indicate the place the selected cells will move to. If there are other cells in the group, then drag the cell/group of cells onto them until a placement field is displayed. Then release the left mouse button.
Selecting a cell type via the context menu
In addition to moving the image of the cell, you can select its type in the context menu. Right-click on the selected cell to summon its context menu, then select the desired type in it with the left mouse button.
To select a type for multiple cells, left-click on each cell image, they will be highlighted with blue frames. Then right-click on one of the selected cells to summon the context menu, and select the desired type in it using the left mouse button. To select all the cells in a group, click on its name.
Once finished with all the cells, click "Save and continue" in the lower right part of the screen. After saving, you will be automatically taken to the "Summary" tab.
"Summary" tab
Use the “Description” field to add details to the summary. The tab also displays the table showing the number of identified cells of each type. To go to the "Cells" tab, click "Back".
If there are several samples in the test, click "Save and validate next sample" to validate the next sample.
Histo and Cyto samples validation
“Summary” tab
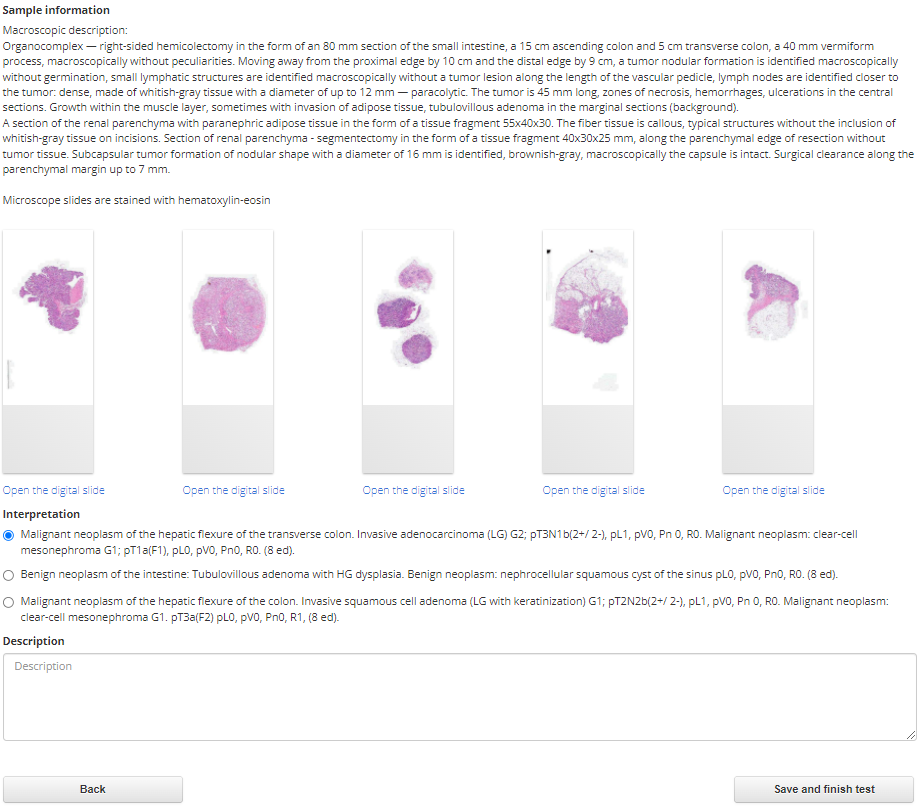
This tab contains information about the sample and the links to digital slides. Study the sample information and the digital slides, and then select one of the interpretations by setting a radio button next to the correct answer. Fill in the “Description” field.
If there are several samples in the test, click "Save and validate next sample" to validate the next sample.
STDs sample validation
“Summary” tab
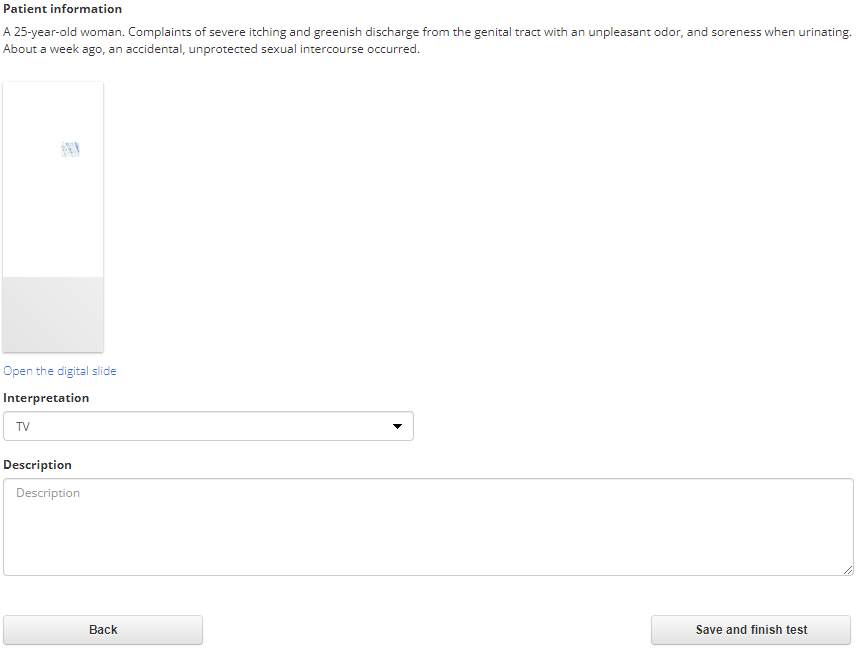
This tab contains information about the sample and a link to the digital slide. Study the sample information and the digital slide, and then select an interpretation from the “Interpretation” drop-down list. Fill in the “Description” field.
If there are several samples in the test, click "Save and validate next sample" to validate the next sample.
Microbiology sample validation
“Summary” tab
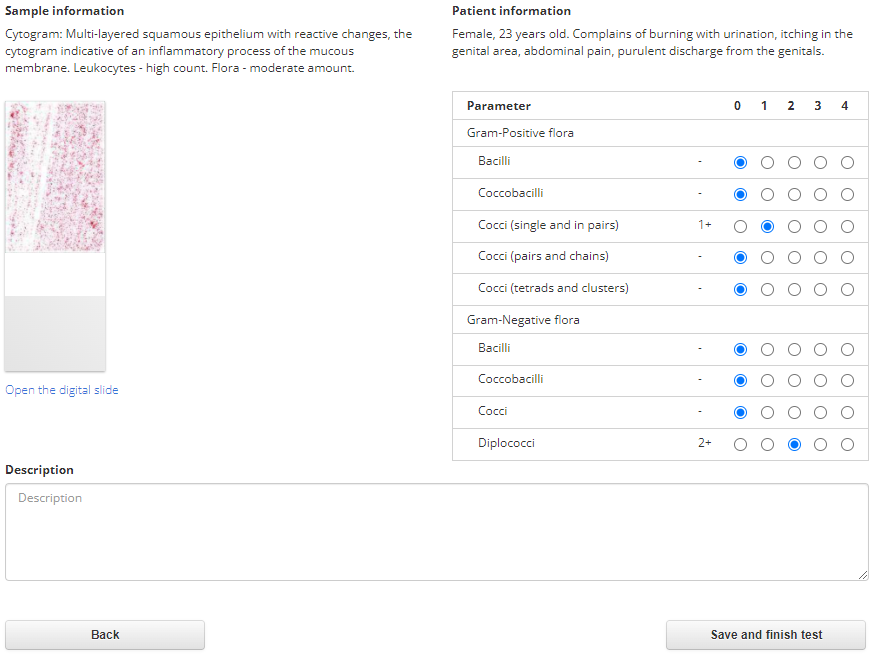
This tab contains information about the sample and a link to the digital slide. Study the sample information and the digital slide, and then set the required parameter values in the table using radio buttons in the corresponding columns. Fill in the “Description” field.
If there are several samples in the test, click "Save and validate next sample" to validate the next sample.
Finishing the validation

Perform validation for all samples in the test, then click the "Save and finish test" button to go to the test completion page.

When you click on the "Save and continue", "Save and validate next sample" or "Save and finish test" buttons, the "Test results were successfully updated" window pops up in the upper right corner.
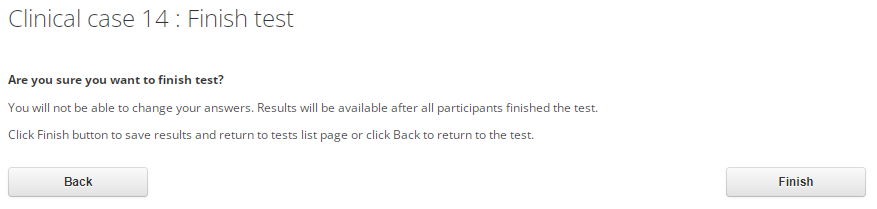
If you have finished working with the test, click the "Finish" button. If you need to go back and continue working with samples, click "Back". After completing the test, you will be redirected to the page with the list of tests. Depending on the test settings, the status of the completed test will change to "Waiting for results" or "Finished".
If the test status is "Waiting for results", you need to wait for all participants to complete the test, then the status will change to "Finished". If the test status is "Finished", the final result will be displayed in the "Result" column.